Sunday, November 15, 2015

How to Unsubscribe from Digi Prepaid Daily Internet

Sometimes when we need some service from the Telco we just subscribe the plan without look much into it. Some of the plan comes with the daily or weekly or monthly auto renew setting. the system will cut your balance and subscribe the plan without your permission and this is kinda annoying and frust you out, specially those who got budget in phone bill or prepaid user.

Now I've found a solution with a credit from goodyfoodies.blogspot, we can un-subscribe the plan we accidentally subscribed.

How to unsubscribe from Digi Internet Packages:

On your keypad, key in *116#.

Press Reply, key in "1" for Internet Packages.

Select the Internet Package that you are subscribed to..
For example, I was subscribed onto the Daily RM3 - so press Reply and key in "5".


Press Reply and key in "1" to unsubscribe.

Finally, key in "1" one more time to confirm unsubscribe.

You will no longer be charged RM3 for daily internet. You will receive a SMS confirming that you have unsubscribed.


Whala~ problem solved~

Saturday, March 15, 2014

Google Chrome scrolling / scroll not working ? Here's the solution

You neither need to install any extensions. Nor need to uninstall and re-install the old version. It's a bug with windows not being able to accept the new updates of Google Chrome.

1. Close your Google Chrome completely.

2. Go to Start > All Programs > Open Google Chrome folder > Right click on Google Chrome icon then select Properties > Under Shortcut Tab Copy the file path in "Start in" C:\Users\(WINDOWS ID)\AppData\Local\Google\Chrome\Application

3. Go to start > Control Panel\All Control Panel Items > Select Mouse > Select Wheel tab > Under Wheel section select Exceptions > A pop up window will show up > Select Add

Type the following under
Application Name: Google Chrome
Program Path: (Paste the file you copied and add \chrome.exe

example: C:\Users\(WINDOWS ID)\AppData\Local\Google\Chrome\Application\chrome.exe

4. Click on Apply and Ok until you exit mouse settings
5. Re-open Google Chrome

Should you have any further queries, please advise and I will do my very best to assist you.

Thank you and have a nice day.

Tuesday, January 28, 2014

Tips And Location Of Files For Resident Evil 3 / Biohazard 3

Tips And Location Of Files For Resident Evil 3 / Biohazard 3

If you want to unlock Jill's Diary, you MUST COLLECT ALL FILES IN ORDER, but then there are many emergency choices might lead you to the wrong sequence, you will need to choose the one I recommend to make you game flow and file collection go by order. Here's some note for your reference:

1) You need to stop by the restaurant before you go to the Raccoon Press building.
2) Take the nearer file 'Photo C' then only 'Reporter's Notebook' at the back of the Raccoon Press building office.
3) When you reach sales office pick up the report stack with remote control first, then the fax place in the drawers to the side of the room, near Murphy's corpse.
4) After Mikhail last stand with Nemesis, you need to choose to pull the emergency brake when the trolley car out of control. You will start outside of the clock tower which you will see file #17 before file #18.
5) When you play as Carlos, go to the fourth (4th) floor of the hospital before you go down basement.
6) Choose to shove Nemesis off of the bridge in the park and You will be able to reach the lounge before the monitor room, file #27 will shows before file #28.

========================================================
HERE'S The FULL List OF FILES THROUGH OUT THE WHOLE GAME
========================================================

#1: Game Instructions #1 : Begining of the game
#2: Game Instructions #2 : Begining of the game
#3: Clock Tower Postcard: On the counter in the bar where you meet Brad.
#4: Photo A: Remember the gate tied with oil soaked rope? Check the corpse behind the barricade, behind the red herbs.

#5: Marvin's Report : If you got play RE2 he is right where Leon or Claire had to shoot him back in the game. Marvin's lying on the floor in the office in the RPD building.

#6: David's Memo : On the table in the darkroom, behind the typewriter.
#7: Fax from Kendo : Check the fax machine right beside the door in the STARS office.
#8: Merc's Diary : Afteryou get the lock pick from RPD you will go through a alley with a red barrel, Drain Deimos crawl out from the window, check the corpse of mercenaries lying in the corner for the handgun bullets and file.

#9: City Guide : On a table in the restaurant.
#10: Photo B : Lying on top of a pay 'phone in the lobby of the Raccoon Press building.
#11: Photo C : On one of the desks in the third-floor office of the Raccoon Press building.
#12: Reporter's Notebook : In the Raccoon Press office, At the very end back of the office.
#13: Mechanic's Memo : Check the sparking control panel in the trolley car.

#14: Manager's Report : Sales office stack with remote control
#15: Business Fax : Sales office too, in the drawers to the side of the room, near Murphy's corpse.

#16: Dario's Memo : At any time after talking to Nicholai and Carlos in the trolley car, make your way back downtown and revisit the warehouse where you started the game. The trailer Dario shut himself up in is now open and the memo is inside.

#17: Operation Instructions : Check the body of the mercenaries in the front hall of the clock tower, it stack together with the mine thrower.

#18: Picture Postcard : On an end table in the clock tower's library, near an open drawer with
an ink ribbon in it.

#19: Mercenary's Pocketbook : In the clock puzzle room, left hand side of the pictures, check the corpse of a mercenarie and a girl hold together.

#20: Director's Diary : In the doctor's office in the hospital. It's visible on the floor next to the dead man on the couch.

#21: Photo D : In the back room on the fourth floor, by the sickroom key.

#22: Medical Instruction Manual : On a counter in the hospital's basement laboratory.

#23: Photo E : The room you lock pick in and get the park key.

#24: Written Orders To The Supervisors : In the Raccoon City Park, head east go pass the wooden bridge then in the woods, one of the dead men on the path has a park key and this file.

#25: Supervisor's Report : Room behind the fireplace in the graveyard tool shed, on the table
#26: Fax from HQ : Room behind the fireplace in the graveyard tool shed, the fax is posted on the nearby chalkboard.

#27: Manager's Diary : In the lounge in the dead factory, by the typewriter. If you pushed
Nemesis off of the bridge, you'll run into Carlos in here.

#28: Security Manual : On a desk in the monitor room in the dead factory, near where you
get the water sample. When you walk in, it'll be in the foreground.

#29: Incinerator Manual : In the room below the control tower, on the wall next to the
ladder. It's very easy to overlook.

#30: Classified Photo : In the junkyard, on the ground. It's right in front of the door
that leads to the final battle with Nemesis.

~ 光之军 ~

Wednesday, January 22, 2014

Resident Evil 2 / Biohazard 2 Notes and Tricks

This is actually the first ever game I play with Play Station 1, ah.... the old days..... Seriously, this is the best ever game I play at that moment, then I play RE3, only then finally I play RE1, you will know how annoying that playing RE1 is more difficult without the auto aim and evade system of RE3. Right, enough old tales, I conclude some of my experience and tricks for Resident Evil 2 / Biohazard 2, check it out:

Side Pack & Sub-machine Gun :
Playing Disc A will be more easy from every presepctive, the key item locations tag with play flow, less enemy (Mr X only appear in Disc B), Final Boss and preparation, weapons (Most of Claire weapons takes two space, stun gun, sub-machine gun, grenade launcher need space for ammo), so I'm suggest you when you play as Leon, don not take the side pack and sub-machine gun in the police station armory, sasve it for Claire, this will make Claire gameplay more easy.

Special Key (changing clothes) :
You must get to the RPD without picking up any items. Brad (the yellow vest zombie) from the STARS Team is now a Zombie and will appear in the tunnel under the RPD entrance, kill it and check the cropse. The Special Key is used on the locker in the Storeroom/Darkroom. For Leon, it will give him access to two changes of clothes. For Claire, the Special Key will give her a new Western costume complete with authentic Six-Shooter (fast shooting 6 bullets hand gun).

Ranking System : 
After beating the game, the ranking screen will display a letter grade (A-F), the number of saves, and the time it took to complete the scenario. The main focus is clearly on the time clock, but the number of saves will also factor heavily into a point system that Resident Evil 2 tracks internally. Try not to save more than 10 times per scenario. The point system is also affected by the use of any weapons with infinite ammo - in other words Special Weapons. You will not get an "A" grade with the use of


Special Weapons:
•Infinite Ammo Rocket Launcher - Complete the 1st Scenario in under 2 1/2 hours. Achieve a grade of A or B
•Infinite Ammo Gatling Gun - Complete the 2nd Scenario in under 2 1/2 hours. Achieve a grade of A or B.
•Infinite Ammo Submachine Gunn - Complete the 2nd Scenario in under 3 hours. Achieve a grade of A or B.
•All 3 Infinite Weapons - Complete the 2nd Scenario in under 2 1/2 hours. Achieve a grade of A or B.

The 4th Survivor - Hunk :
Hunk is one of the Umbrella Corporation's goons sent to steal the G-Virus from William Birkin. To plays as Hunk you must beat the 2nd Scenario in under 3 Hours with a grade of A. If you have accomplished this task correctly, a screen with Hunk will be followed by the option to create a Hunk save file. Save and you will be able to load Hunk's game from either Resident Evil 2 disc.

The Tofu Survivor :
This trick is completely whacked out and requires incredible dedication to playing the game through and through and through again. Here's how to find Tofu.
The entire game (1st + 2nd Scenario) must be played through three times, plus you must find Hunk along the way. You must start from the newly created Leon or Claire save file each time through. In addition, the Hunk File must exist on your memory card BEFORE playing the game through for the third time.

Saturday, May 18, 2013

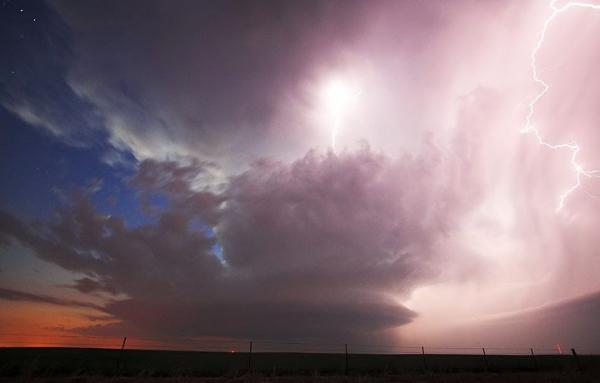
犹如核爆般的巨厚雲牆--超級單體風暴照片


這張照片拍攝於內布拉斯加州,整個場景看上去就像是某部災難大片。

    【新聞主題】:寰宇蒐奇/巨厚雲牆如核爆 超級單體風暴經典照!
    【新聞連結】:http://www.nownews.com/2013/04/04/11623-2922177.htm
    【新聞出處】:NOWnews
    【發布日期】:2012/04/04   Pm 20:26
    【文章內容】:大陸新聞中心/綜合報導

這張照片拍攝於內布拉斯加州,整個場景看上去就像是某部災難大片。赫靈謝德在傍晚拍攝了這張照片,在藍色和紫色的奇異雲彩映襯下,顯出一種尤其陰森驚豔的氣氛。

據新華網報導,滾動的雷暴雲團在頭頂低沉地轟鳴。整個天空暗無天日,緩慢旋轉,一切似乎顯出不詳的徵兆。如果這是電影的話,這時大概就會有UFO從雲層裡穿出來了,
或者也可能是某種擁有超自然力量的生物,但這確實是大自然中真實的鏡頭,這種狂暴景象被稱作『超級單體風暴』。

超級單體風暴是你所能想像得到的最狂暴,最強大,很多時候也是最具破壞性的風暴體系,並且它們體型巨大,其影響範圍最高可以達到地面以上32公里的高空。
如果條件合適,它們幾乎可以出現在任何地方的上空,但它們最長光顧的地方還是美國境內有名的『龍捲風走廊』地帶。

追風者麥克·赫靈謝德來自網站『極端不穩』,他在不同的地點拍攝這些超級單體風暴的震撼場景。這些照片真的能讓人屏住呼吸,這是對拍攝者勇氣的最好的犒賞。
赫靈謝德從1999年以來一直在追逐暴風,從2004年開始嘗試進行拍攝。超級單體風暴的頭頂部展開狀結構被稱作『砧狀雲』,這是由於上升的氣流抵達最高層無法繼續上升後向周圍擴散後形成的。

降雨型超級單體風暴被認為是尤其危險的類型,因為它帶來的濃密雨幕會遮蔽並隱藏其中的龍捲風結構,大約有30%的超級單體風暴最終會發展成為龍捲風,
這對於那些生活在受襲擊地區的人們來說似乎並不是一個好消息,除非你是一個和赫靈謝德一樣的追風者。


這張照片拍攝於南達科他州,時間是2010年7月23日。這場風暴被載入了史冊,因為它降下了有記錄以來個頭最大的冰雹,其中一個冰雹體的直徑達到20公分。
這塊超大冰雹塊體是由一位名叫李·斯科特的人撿到的,他將這塊大傢伙放進冰櫃保存,並交給了美國國家氣象中心。


這張照片拍攝於美國內布拉斯加州。這個巨大的超級單體風暴中央部位正發生強烈的降雨過程。事實上超級單體風暴的確也常常會伴隨有短時的劇烈降雨或冰雹災害,有時候它們會引發洪澇災害。


位於超級單體風暴底部的這種結構被稱作『雲牆』。在這張照片中,這堵厚厚的雲牆與其背後閃耀的夕陽構成強烈的對比,這張作品拍攝於美國南達科他州。


圖像右側可以看到電閃雷鳴。這個超級單體風暴系統異常強大,看上去似乎就像是原子彈爆炸時候的蘑菇雲,或者是某種在天空中翻滾的巨型波浪。


這張照片是赫靈謝德在內布拉斯加州拍攝的。在這張照片中,風暴雲中正降下暴雨,這是低高度型的單體風暴系統,一般認為這是規模最小的超級單體風暴。


這張照片的整個右半部分都被閃電占據,整個畫面與左側的日落景象形成強烈對比。在圖像左上方還能隱約看到幾顆星,這證明了天空的部分區域透明度還是很高的。
整張照片的意境幾乎就像是一幅對比強烈的畫作,這張作品拍攝於2008年3月30日,地點是美國奧克拉荷馬州。


正在下落的太陽為這個巨大的暗灰色單體風暴系統底部增添了色彩和層次感。這張照片拍攝於內布拉斯加州,整幅畫面既透出凶險又顯出美麗。


這是和上一張照片拍攝於同一地點的另外一次單體風暴系統。赫靈謝德指出在這張照片中你可以看到圍繞上升氣流周圍開始形成轉動的風暴體系。不過這個系統最終並未能成型,最終它不斷上升進入高層大氣並消失了。


赫靈謝德在內布拉斯加州境內拍攝了這張降雨型超級單體風暴的照片。當他拍攝下這張照片時,氣象局發布了龍捲風警報,不過最後這一預料中的風暴並未出現。


在這一超級單體風暴下方,巨大的雲層仿佛一張張開的大嘴要吞噬一切。這些雲牆是當溫度較低的下降氣流被上升氣流抬起,其重量越來越大並達到飽和狀態,最終開始緩慢下降過程中形成的。如果雲牆持續超過10分鐘,或者圍繞中央劇烈轉動,可能表明其中正在孕育龍捲風。
 

Parasite Eve: The 3rd Birthday PSP FEATS how to get/archive FULL LIST


In my late 1990’s I’ve been introduce to Play Station, many epic games ancestor, FF series, Resident Evil/Biohazard, MGS, Digimon, Silent Hill, KOF, Street Fighter, etc, Parasite Eve is one of the best PS game heritage. OK, Main purpose, here I’ll list out the Feats you can archive in Parasite Eve: The 3rd Birthday. By archive these feats in each mission, you will unlock lots of goodies such as new upgrade parts for weapons, also unlock cheat codes you may use in game. Each mission will have few chapters, and there are few feats you can archive in each of it, you can check the requirement of each feats by checking it in the “FEATS” tab in status menu, by press ‘start’ in middle of the mission. Different feat need different strategy to archive, such as kill all the enemies, run from an enemies unharmed, defeat certain enemies, move soldiers in certain pattern or ways using overdive, etc. 

Extra info I patch from wiki : The infamous shower FMV can be viewed between episodes in either the locker room at CTI HQ or the shower room in Maeda's hideout; the requirement to view it is that Aya must accomplish a particular feat in the preceding episode. The feat required is different on each difficulty level, but if Aya fails the required feat, examining the shower will give an indication of which feat was needed, such as "I can't let those Snatchers take me!" for the first feat of chapter 3-2. Unsurprisingly, the shower scene is not viewable between Episodes 0 and 1, due to episode 0 having no feats; also, between Episodes 5 and 6, there is no opportunity to view it, so Episode 5 feats are not relevant to the scene.
There are five different "ranks" of feat, defined by the BP reward. These will be referred to as ranks one to five in this article (as an alphabetical scale would risk confusion with the game's Episode ranks); the BP rewards are as follows: 


Easy and
Normal
Hard
(150%)
Deadly
(225%)
Insane
(337.5%?)
Rank 1
1,200
1,800
2,700
04,050?
Rank 2
1,600
2,400
3,600
05,400?
Rank 3
2,000
3,000
4,500
06,750?
Rank 4
3,000
4,500
6,750
10,125?
Rank 5
4,000
6,000
9,000
13,500?


----------------------------------------------------------------------------------------

 Episode 1 (Operation Rainbow Dust)
  • By achieving at least four feats in this Episode on Hard mode, the "No Armor" cheat code will be unlocked.
  • By achieving at least four feats in this Episode on Deadly mode, the "Static LIFE" cheat code will be unlocked.
Chapter 1-1
Rendezvous with team unharmed
  • Aya must reach the safe room without having taken any damage whatsoever (even if she recovers the HP).
  • Feat received after entering the safe room.
  • Rank 3 feat.
Destroy all Wads
  • Aya must destroy every Wad in the chapter. Two Wads in the last zone before the safe room only appear when Aya approaches the metal mesh fences; one fence is at the start of the zone, and the other is behind the orb.
  • Feat received after defeating the last Wad.
  • Rank 2 feat.
Destroy all Slackers
  • Aya must destroy every Slacker in the chapter.
  • Feat received after defeating the last Slacker.
  • Rank 1 feat.
Chapter 1-2
Bring civilians to safety
  • Aya must take at least five civilians to the safe room by Overdiving into them and returning there. The civilian in the room before the safe room (the one with the first securable platform) counts towards the quota. There are a total of six civilians that can be saved in the chapter.
  • Feat received after rescuing the fifth civilian.
  • Rank 2 feat.
Secure platform
  • In either of the two rooms with soldiers on a raised platform, Aya must kill all of the Twisted before they destroy the platform.
  • Feat received after leaving the room with the secured platform.
  • Rank 1 feat.
Chapter 1-3
Escape from Reapers unharmed
  • Aya must traverse the two zones with Reapers without taking any damage. Furthermore, when the Reapers are in their seraching orb form, them touching Aya and materialising counts as being harmed by them; this is particularly irritating with the second Reaper, which has a tendency to pop up right next to Aya when it's least expected, making it harder to avoid. For the first Reaper, avoiding harm is most easily done by taking the right-hand path when the corridor splits; however, this will deprive the player of the next feat (see below).
  • Feat received after reaching the safe room after the second Reaper.
  • Rank 2 feat.
Swift retreat from first Reaper
  • Aya must take the left-hand path when the corridor splits while fleeing the first Reaper. If she becomes be trapped between the blood walls, the above feat is rendered impossible, as she will be unable to escape until the Reaper touches her; it is, however, possible to "outrun" the walls with well-executed dodge rolls (in particular, repeating two rolls followed by a normal step to avoid the third roll's cooldown), although this may take practice. It is generally easier to enter Liberation just before turning the corner into the left-hand path, then flash-step past the walls. The player should, however, be ready to act fast when Liberation ends, lest the Reaper catch up while Aya is recovering.
  • Feat received when Aya drops to the lower floor level at the end of the left-hand path.
  • Rank 2 feat.
Rescue civilian from Reaper
  • When fleeing the second Reaper, Aya must Overdive into the civilian and take them to the subsequent safe room.
  • Feat received after reaching the safe room with the civilian.
  • Rank 2 feat.
----------------------------------------------------------------------------------------

Episode 2 (Operation Black Storm)
  • By achieving at least four feats in this Episode on Hard mode, the "No Evasion Assist" cheat code will be unlocked.
  • By achieving at least four feats in this Episode on Deadly mode, the "Limited Weapons" cheat code will be unlocked.
Chapter 2-1
Use Overdive Kill frequently
  • Aya must use Overdive Kill on at least eight enemies duing the chapter.
  • Feat received after meeting the quota.
  • Rank 1 feat.
Swiftly ward off Roller
  • Aya must destroy the Roller in the alleyway very soon after it spawns.
  • Feat received after defeating the Roller.
  • Rank 1 feat.
Swiftly ward off Rover
  • Aya must kill the Rover before Gabrielle arrives.
  • Feat received after defeating the Rover.
  • Rank 5 feat.
Chapter 2-2
Preserve Overdive ability
  • Aya must Overdive into other people as few times as possible during the chapter.
  • Feat received after defeating the Queen.
  • Rank 2 feat.
Use satellite cannon
  • Aya must kill at least ten enemies using the satellite cannon. Note that enemies by the final trio of orbs will respawn indefinitely while the orbs remain, so one can take the time to meet the quota there before entering the Babel.
  • Feat received after meeting the quota.
  • Rank 1 feat.
Swift return from inside Babel
  • Aya must kill the Queen before it enters the vortex phase of the battle.
  • Feat received after defeating the Queen.
  • Rank 4 feat.
Chapter 2-3
Clear out all poison fog
  • Aya must destroy all of the fog-emitting Stinkers in the chapter. Note that after leaving the street with a high concentration of Stinkers, Aya should return immediately to spawn a new set which must also be killed.
  • Feat received after clearing the Beans and Stinkers on the roof.
  • Required for the shower FMV on Easy mode.
  • Rank 1 feat.
Swiftly breach the orb nest
  • Aya should focus on destroying the orbs before quickly mopping up the surrounding enemies.
  • Feat received when all enemies in the orb nest are defeated.
  • Rank 1 feat.

----------------------------------------------------------------------------------------
 
Episode 3 (Operation Red Fog)
  • By achieving at least three feats in this Episode on Hard mode, the "No Regen" cheat code will be unlocked.
  • By achieving at least three feats in this Episode on Deadly mode, the "Level Hold" cheat code will be unlocked.
Chapter 3-1
Avoid Rover battle
  • Aya must evade all of the Detectors in the chapter, thus avoiding them calling the Rovers into the physical plane. This can become particularly tricky after going down the stairs to the rail platform, especially if the player is also attempting the chapter's third feat (see below).
  • Required for the shower FMV on Normal mode.
  • Rank 1 feat.
Destroy all Snatchers
  • Aya must kill every Snatcher in the chapter. This is quite easy, as killing the first group is preferable to trying to outrun them, and killing the second group is compulsory.
  • Feat received after killing the last Snatcher.
  • Rank 2 feat.
Recover all supplies
  • Aya must collect every ammo recharge and box of grenades in the chapter. The one on the railway platform can be a nuisance to players attempting to avoid Detectors for the chapter's first feat (see above). The first box is easily missed; it is in the alcove behind Aya as she approaches the exit of the first zone.
  • Feat received after collecting the last box of supplies.
  • Required for the shower FMV on Easy mode.
  • Rank 1 feat.
Chapter 3-2
No soldiers taken by Snatchers
  • Aya must prevent any soldiers from being dragged into the Snatchers' spiderweb wormholes. If a soldier is grabbed by a Snatcher, Aya must shoot it to make it drop them.
  • Feat received after clearing the Snatcher-filled room after the train crashes.
  • Required for the shower FMV on Hard mode.
  • Rank 4 feat.
Destroy all orbs
  • Aya must destroy every orb in the chapter.
  • Feat received after destroying the last orb.
  • Rank 1 feat.
Evade infrared traps
  • Aya must not make contact with the infrared traps in the chapter.
  • Feat received after leaving the zone filled with infrared traps.
  • Rank 1 feat.

----------------------------------------------------------------------------------------
 
Episode 4 (Operation Blue Hail)
  • By achieving at least three feats in this Episode on Hard mode, the "No Info" cheat code will be unlocked.
  • By achieving at least three feats in this Episode on Deadly mode, the "Critical Illness" cheat code will be unlocked.
Chapter 4-1
Secure barricade
  • Aya must not allow any of the orange barricades in the chapter to be destroyed.
  • Feat received when entering the lift.
  • Required in order to see the shower FMV between Episodes 3 and 4 on Hard mode.
  • Rank 2 feat.
Tank team survivors unharmed
  • At the start of the chapter, Aya must defeat the Worm without the three tanks sustaining any damage. This is best done by quickly eliminating the runt spawn with well-placed missiles, then focusing on the giant Worm. All fireballs should be shot out of the air with gunfire, and even more importantly, the greenish watery orbs should be shot to prevent the spawning of fresh runts. This tactic is also important for the next feat (see below).
  • Feat received when the giant Worm is killed.
  • Required for the shower FMV on Deadly mode.
  • Rank 4 feat.
Swiftly breach tower
  • Aya must destroy the giant Worm as quickly as possible. In particular, the player should endeavour to prevent the spawning of fresh runts by using the tanks' machine guns to shoot the watery orbs spat out by the Worm. This tactic is also helpful for the previous feat (see above). This feat can be a matter of practice and luck more than most other feats, as aiming missiles at the Worm's mouth is not exactly easy due to its tendency to suddenly move its head.
  • Feat received when the giant Worm is killed.
  • Required for the shower FMV on Hard mode.
  • Rank 4 feat.
Chapter 4-2
Reinforcements survived
  • After the helicopter segment, Aya must kill the two runt spawn on the top floor without the soldiers dying. If a soldier is sucked into the maw of one of the spawn, the only reliable way to save them is to Overdive into them and then enter Liberation.
  • Feat received when entering the safe room after killing the two runt spawn.
  • Rank 3 feat.
Secure air supremacy
  • Aya must destroy at least twenty Spitters on the building exterior.
  • Feat received after killing the twentieth Spitter.
  • Required for the shower FMV on Normal mode.
  • Rank 2 feat.
Assist with retreat
  • Aya must kill the first runt spawn seen in the helicoptor segment of the chapter. Note that the opportunity to do so is fairly short.
  • Feat received after killing the runt spawn.
  • Required for the shower FMV on Easy mode.
  • Rank 1 feat.


 ----------------------------------------------------------------------------------------
 
Episode 5 (Operation Scarlet Snow)
  • By achieving at least five feats in this Episode on Hard mode, the "Critical Disease" cheat code will be unlocked.
  • By achieving at least five feats in this Episode on Deadly mode, the "Half Ammo" cheat code will be unlocked.
Chapter 5-1
Conserve ammo
  • In the zone where there are several barricades and orbs, with Beans, Wads and Rollers, Aya should quickly destroy the orbs before turning her attention to the Twisted. This "conserves ammo" by preventing the arrival of additional Twisted.
  • Feat received after leaving the zone.
  • Rank 2 feat.
Sustain reinforcements
  • Aya must not allow any of the soldiers in the chapter to die.
  • Feat received after reaching the safe room at the end of the chapter.
  • Rank 3 feat.
Destroy all orbs
  • Aya must destroy all of the orbs in the chapter. This should follow by default if the chapter's first feat is accomplished (see above).
  • Feat received after reaching the safe room at the end of the chapter.
  • Rank 1 feat.
Chapter 5-2
No allies turned into Twisted
  • Aya must kill the Mudflaps before they can turn any soldiers into Slackers, and must do so with an Overdive Kill so that they cannot possess a soldier to regenerate.
  • Feat received when leaving the zone after killing the second Mudflap.
  • Rank 3 feat.
Act fast in first Mudflap battle
  • Aya should immediately destroy the three orbs near the first Mudflap, before any Twisted can spawn from them.
  • Feat received when leaving the zone after defeating the first Mudflap.
  • Rank 1 feat.
No backup on second Mudflap
  • Aya must not allow any additional soldiers to arrive when fighting the second Mudflap. The most reliable way to do this is to simply avoid destroying any of the orbs in the zone, although this does mean forfeiting the supplies behind them. Since the soldiers will shoot at the orbs once the Snatchers are defeated, the player should Overdive into each soldier and move them to the entrance, where they cannot target the orbs.
  • Feat received after leaving the zone.
  • Rank 3 feat.
Chapter 5-3
Sustain reinforcements
  • Aya must not allow any of the soldiers in the chapter to die.
  • Feat received after reaching the safe room at the end of the chapter.
  • Rank 4 feat.
Destroy all Beans
  • Aya must kill at least five Beans during the chapter. Beans will spawn indefinitely in the corridor with the blue walls, as long as those walls remain raised.
  • Feat received when the fifth Bean is killed.
  • Rank 3 feat.
Destroy all Rollers
  • Aya must kill at least fifteen Rollers during the chapter. Rollers will spawn indefinitely in the two-tiered chamber as long as the upper orbs are intact.
  • Feat received when the fifteenth Roller is killed.
  • Rank 2 feat.
Chapter 5-4
Reinforcements survived
  • Aya must not allow any soldiers to die in the battle against the Reaper.
  • Feat received when leaving the zone after defeating the Reaper.
  • Rank 3 feat.

Additional feat-related unlockables
  • By achieving at least 75% of all feats on Hard mode, the "No Over Energy" cheat code will be unlocked.
  • By achieving at least 75% of all feats on Deadly mode, the "NPC One-hit Death" cheat code will be unlocked.
  • By achieving at least 50% of all feats on Hard mode and higher, the Lightning Custom outfit will be unlocked.
  • By achieving at least 75% of all feats on Hard mode and higher, the "No Cover" cheat code will be unlocked.